#include <avr/pgmspace.h>
 char buffer [5];
 word serialCount;
void setup(void)
{
    Serial.begin(38400);
    Serial.println("\nPress space bar .");
//    while (Serial.read() != 32)   delay(1); // Wait for space

}
const int mydata[10][10] PROGMEM = {
    '0', '1', '2', '3', '4', '5', '6', '7', '8', 'A',
    '1', '1', '2', '3', '4', '5', '6', '7', '8', 'B',
    '2', '1', '2', '3', '4', '5', '6', '7', '8', 'C',
    '3', '1', '2', '3', '4', '5', '6', '7', '8', 'D',
    '4', '1', '2', '3', '4', '5', '6', '7', '8', 'E',
    '5', '1', '2', '3', '4', '5', '6', '7', '8', 'F',
    '6', '1', '2', '3', '4', '5', '6', '7', '8', 'G',
    '7', '1', '2', '3', '4', '5', '6', '7', '8', 'H',
    '8', '1', '2', '3', '4', '5', '6', '7', '8', 'I',
    '9', '1', '2', '3', '4', '5', '6', '7', '8', 'Z' };

void loop(void) {
    int i,j;
    byte n;
    Serial.println("\nData by Rows.");
    for (i=0; i < 100;i++) {
  // Serial.println(" ");
        if ((i %8)==0) Serial.print("|");
        if ((i %16)==0) Serial.println("");
   n = pgm_read_byte_near(i);
 // Serial.print(n, HEX);
          Serial.print(" ");
          sprintf(buffer, "%02x", n);
          Serial.print(buffer);
          serialCount++;

         // Serial.print("\t");
     }

    Serial.println(" ");
    Serial.println("\nData by Columns.");
    for (i=0; i < 10; i++) {
   Serial.println(" ");
   for (j=0; j < 10; j++) {
  n = pgm_read_word_near(&mydata[j][i]);
  Serial.print(n, BYTE);
   }
    }
    Serial.println(" ");    setup();    Serial.println(" ");  //start over
}
Tuesday, November 1, 2011
PROGMEM example

Tuesday, October 25, 2011
Timer0 First Program- Polling
/*
  Timer 0 Experiment
 */
int state = 1;
byte ticks, tocks;
long loopCounter;
long popCounter;
unsigned long time;
void setup() {
  // initialize the digital pin as an output.
  // Pin 13 has an LED connected on most Arduino boards:
  pinMode(13, OUTPUT);
  TIMSK0 = 0;     //turn off Interrupt for Timer0
  TCCR0B = 5; //Prescaler divieds by 1024
  Serial.begin(9600);
}

void loop() {

   while(byte(TIFR0 &0x01) ==0){}; // loop til flag goes up
    TIFR0 = 1;      //clear flag
    ticks++;

    if (ticks == 60) {
      ticks=0;
      ToggleLED();
  //    Serial.print("TT ");
    }
}
void ToggleLED(){
  if (state==1) {
    digitalWrite(13,LOW);
    state = 0;
  }
  else {
    digitalWrite(13,HIGH);
    state=1;
 //   Serial.print("I've tohggled");
  }
}
Sunday, September 18, 2011
IIC or I2C or TWI
 |
| The TWI bus |
Good tutorial from DigiKey
other training modules of electronic parts from digikey
A good introduction to IIC with an Arduino Focus is here.
The Arduino library with functions that handle the TWI bus is the Wire Library
A good example of using IIC eeproms with Arduinos is here.
A typical IIC device is the eeprom below.

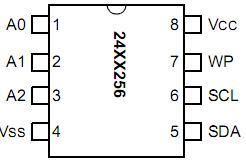
An Arduino setup


and you can join up two Arduinos using the IIC bus


This code worked for me straight from the forum to the freetronics eleven at 24LC256.
And here's the data on the24LC256 eeprom.
Tuesday, September 13, 2011

Tuesday, August 30, 2011
Accelerometers
How do we sense movement and store and display it? Study this IC and come up with a schematic and software to read and display outputs. See the associated task.


Tuesday, August 23, 2011
Pin outs
We found that the pins on the Arduino board did not correspond to the pins on the AVR Mega328. Here's a useful mapping of pins. Note the two hardware interrupt pins.


Interrupts
There are two hardware interrupt pins on our Arduino. Interrupt 0 and interrupt 1. These cut off what ever processing is going on and carry out the interrupt service routine that you indicate.


Subscribe to:
Posts (Atom)